
Get started building your own beautiful Google Review Feed.
Learn how to get started with this guide below.
In this guide we will outline how you can get started building your own feed for Google Reviews. These guides are focused for Webflow users, but the principles can be applied to any development platform or approach that will support HTML attributes.
In general, you should understand the following simple concept - FeedSpring connects the structural <HTML> elements of your site with the live data from your favourite services. We do this through the use of attributes. This means that you can build any design with any layout you want, then add attributes to elements in order to render the live content.
To get started, select add a new feed from your dashboard and select the Google Review Feed.
From here, you can authorize your account and get started connecting it with FeedSpring. FeedSpring uses your platform's authentication & official APIs to ensure the most secure, fast and effective service for your feeds.
With FeedSpring, you can choose from two implementation types - Attributes or Widget. Our attributes method is currently available, however the widget builder will be coming soon. Remember to keep an eye out for the in application prompts and tips for further help along the way.
For Google Reviews, be sure to select your business location. You'll be prompted to input this before you choose an implementation type.
Add the FeedSpring script to the <head> tag of your project.
If you are using Webflow, you can add this to your page settings, or globally through your project settings.
<script src="https://scripts.feedspring.co/google-reviews-attrs.js" async defer></script>
We will now begin to build the foundation of your feed by adding two core elements - the Feed & Post Wrappers.
The Feed Wrapper Attribute helps us identify where your feed is located on the page. This attribute should be attached to something that will wrap all your feed content. In most cases this might be a section (div) or the container <div>. You can also add a new div-block and use this to wrap the feed.
Simply add the attribute Name: feedspring and your unique attribute value Value: google_xxxxxxx
You will find these values from your build page in app.
Want a visual example? Check out this read-only demo.
Now we can add the Post Wrapper Attribute. Think of this as an individual item from one of your feeds - for example, an Instagram post, a Google review, a Youtube video. Inside this feed item is where we will have most of our content like images, captions, reviews etc.
Simply add the attribute Name: feedspring and your attribute value Value: post
Want a visual example? Check out this read-only demo.
In this section we will now add additional attributes to our elements to start rendering content. You can check the table for a full list of available attributes and learn more about each of them down below.
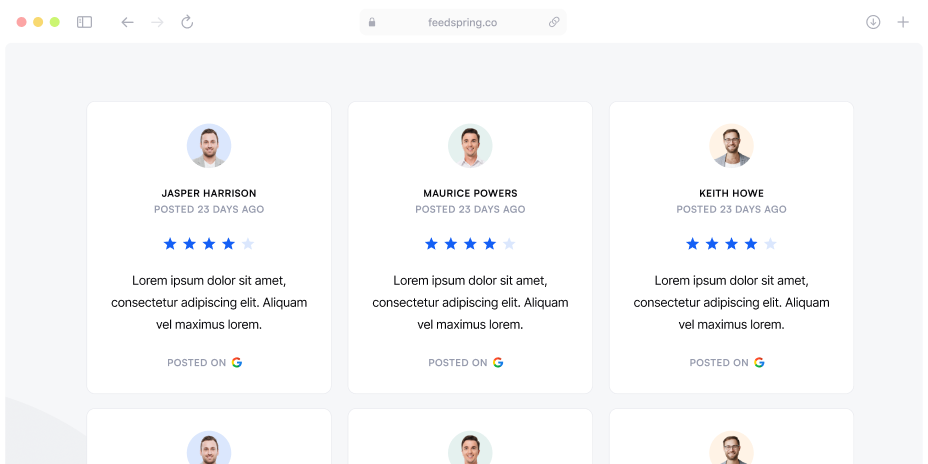
This table outlines all the attributes you can add to build your feed. For example, to display the review author's name, you will add the attribute Name: feed-field and the attribute value as Value: name


To show the review text for your Google feed, add the attribute to a <text-block> on your page.
Add the attribute Name: feed-field and add the attribute value Value: review
To show the author's avatar, add the attribute to an <img> element on your page.
Add the attribute Name: feed-field and add the attribute value Value: avatar
If the author doesn't use a custom avatar, we will use the default letter avatar provided by Google.
Bonus tip: While your feed is loading the placeholder image might show to the customer until it is rendered. You can improve this by adding any type of placeholder image, like your brands logo or a simple loader gif. Here's a simple animated loader that you can download and use as your placeholder.
To show the author's name, add the attribute to a <text-block> on your page.
Add the attribute Name: feed-field and add the attribute value Value: name
To show the stars from a rating, add the attribute to an <img> on your page (typically to a star vector).
Add the attribute Name: feed-field and add the attribute value Value: star

To show the empty stars from a rating, add the attributes to a <img> on your page (typically to a star vector).
Add the attribute Name: feed-field and add the attribute value Value: star-inactive

To show the review's timestamp, add the following attribute to a <text-block> on your page. By default, your timestamp will be displayed like this - October 09, 2023.
Add the attribute Name: feed-field and add the attribute value Value: timestamp
Bonus tip: You can add a custom timestamp, by using the formats here. You can also use our pre-set format, which renders in the following format - 12 days ago. To add this pre-set, simply add an additional attribute Name: feed-timestamp and add the attribute value Value: from-now Add this attribute as well as the original attribute listed above.
To show the rating number, add the following attribute to a <text-block> on your page.
Add the attribute Name: feed-field and add the attribute value Value: rating
To show the rating as a written word, add the following attribute to a <text-block> on your page.
Add the attribute Name: feed-field and add the attribute value Value: rating-string
To show the number of total reviews, add the following attribute to a <text-block> on your page.
Add the attribute Name: feed-field and add the attribute value Value: total
Please Note: The Total Review attribute can only be used on single location businesses. If you selected multiple locations during the location setup, you will be unable to use this attribute.
To show the average rating, add the following attribute to a <text-block> on your page.
Add the attribute Name: feed-field and add the attribute value Value: average-rating
Please Note: The Average Rating attribute can only be used on single location businesses. If you selected multiple locations during the location setup, you will be unable to use this attribute.
Once you have completed the core build, you can continue on to add Additional Settings to your feed - including naming your feed, choosing the number of images you want to display and adding whitelist domains.
You can can test your feed by publishing your website and reviewing the live link. If something doesn't look right and you need to troubleshoot errors, right click on your page and click 'Inspect', then navigate to the console tab at the top. Here we will display any errors we found with your setup. If you need assistance, reach out to our friendly team for help.
Powerful feeds ⚡️ for your Webflow sites.
